This article depicts the accomplishment of the objectives of the integration that impacts delivering software faster with no bugs, the issues confronted and the proposed upgrade to convey smooth and qualitative Software. The key goals hereby, are to develop confidence to modify code and validate it quickly, to be in a position to perform tech upgrades without any manual effort & to achieve zero need for manual testing.
Introduction
During the development process, it is vital to run your web application’s test suite frequently to maintain a strategic distance from any unanticipated issues and to ensure that everything is running smooth. However, it can be difficult to never forget to run the tests as you go, and also, as your test suite gets bigger, it takes longer and longer to run. This is where a continuous integration server comes into picture. A CI server can automatically build your application and run tests when you make changes. Moreover, it also notifies you to any errors or test failures.Jenkins is one such popular open source CI server on Ubuntu 14.
Setting up of Jenkins
I will set up Jenkins, a popular open source CI server on Ubuntu 14. I will then configure it to run a Ruby on Rails project’s Rspec specs and code coverage report when a change is pushed to GitHub.
Installation of Jenkins
1. System Update – sudo apt-get update
2. Web Server – if any web server not installed on your system – sudo apt-get install nginx
3. Java – sudo apt-get install openjdk-7-jdk
4. wget -q -O – http://pkg.jenkins-ci.org/debian/jenkins-ci.org.key | sudo apt-key add –
5. sudo sh -c ‘echo deb http://pkg.jenkins-ci.org/debian binary/ > /etc/apt/sources.list.d/jenkins.list’
6. sudo apt-get update
7. sudo apt-get install jenkins
8. sudo service jenkins restart
9. Type ssh-keygen in your local system and add the key into your project repository in GitHub.
Configuration of Jenkins
1. Go to http://localhost:8080
2. It will ask for Admin password get it from /var/lib/jenkins/secrets/initialAdminPassword
- sudo chmod -R 777 /var/lib/jenkins/secrets if you don’t have permission to the folder
- vi /var/lib/jenkins/secrets/initialAdminPassword
3. To install required plugins, click “Manage Jenkins” then “Manage Plugins” From the “Available” tab, check the following plugins:
- Git
- GitHub
- Rvm
- Rake
- DocLink
- Maven
4. Next, select “Download now and install after restart”
5. Configure Global Security. Navigate back to “Manage Jenkins” and select “Configure Global Security”. On this screen, check “Enable Security”, then “Jenkins’ own user database” under “Security Realm”. After that, select “Project-based Matrix Authorization Strategy” under “Authorization”.
6. From there, add “admin” and “github” users, checking all permissions for admin and only “Read” for github. Confirm your settings with the screenshot below and save the changes.
Configuration of the Project
1. From the home page, click on “New Item”, then select “Build a free-style software project” and click “OK”.
2. Fill in the “Project Name” and “GitHub project” fields.
3. Under “Source Code Management”, select “Git” and fill in the repo url. (If you need to authenticate with SSH, configure that here.)
4. Click Run the build in a RVM-managed environment and add rvm version.
5. In build, select “Execute Shell Commands” and specify the following commands:
- #!/bin/bash -e
- source ~/.bashrc
- rvm use 2.3.0
- bundle install
- export RAILS_ENV=test
- rake db:create
- rake db:schema:load
- rake test:prepare
- rspec spec
6. To make sure that you know when a build fails, set up email notifications in “Add post-build action”. Configure SMTP on the “Configure System” page, found under “Manage Jenkins”.
7. In post build actions, select “Publish Document” and configure like below.
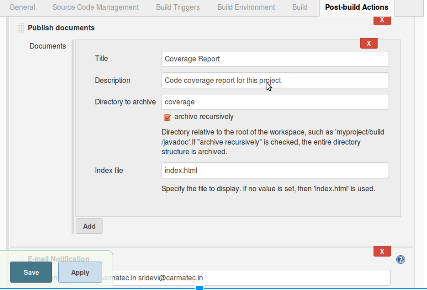
Testing using Jenkins
- Select the project you want to build, from the available list of projects.
- Click on “Build Now”.
- Go to “Build History” and click on latest build number.
If the build is in red color, it means that the build is failed.
- Fix the setup errors, if any.
- Fix the failed test cases and build again.
If the build is in blue color, it means that the build is a success and the code is ready to be deployed.
- Click on “Code Coverage Report”.
- Click on the controller for the test cases you wrote.
- Check the code coverage percentage.
- If it’s not 100% covered, Check the line numbers and cover.
References
http://www.webascender.com/Blog/ID/522/Setting-up-Jenkins-for-GitHub-Rails-Rspec#.WG8_Lp6qq1F
RailsCarma has been offering Rails Development services for over past 8 years. Our developers are well versed with executing all kind of ruby on rails application development projects and enhancing the features of your existing Ruby on Rails applications. Contact us to know more about our development skills and the projects we have worked on.